

How To Update One Datatable Changes To Another Datatable C#
Give-and-take
Afterward yous create a chart, y'all can edit the data in the Excel sheet. The changes will be reflected in the nautical chart in Discussion.
-
On the View menu, click Print Layout.
-
Click the chart.
-
On the Nautical chart Design tab, click Edit Data in Excel.
Excel opens and displays the information table for the chart.
-
To modify the number of rows and columns that are included in the chart, rest the arrow on the lower-right corner of the selected data, and then drag to select additional data. In the following example, the table is expanded to include additional categories and data series.
-
To add data to or edit data in a cell, click the jail cell, and then make the change.
-
To encounter the results of your changes, switch to Word.
Later on you create a chart, you might want to change the style that table rows and columns are plotted in the chart. For instance, your outset version of a chart might plot the rows of data from the table on the chart'south vertical (value) axis, and the columns of data on the horizontal (category) axis. In the following example, the chart emphasizes sales by instrument.
All the same, if you want the nautical chart to emphasize the sales by calendar month, you tin can opposite the way the chart is plotted.
-
On the View menu, click Print Layout.
-
Click the chart.
-
On the Chart Design tab, click Switch Row/Column.
Switch Row/Column is available only when the chart'south Excel data table is open and only for certain chart types. If Switch Row/Column is not available:
-
Click the chart.
-
On the Chart Blueprint tab, click Edit Data in Excel.
-
To modify the gild of a data series, you need to work with a chart that has more than one data series.
-
On the View card, click Print Layout.
-
In the nautical chart, select a information series. For example, in a column nautical chart, click a column, and all the columns of that data series get selected.
-
On the Chart Pattern tab, click Select Data.
-
In the Select Information Source dialog box, side by side to Fable entries (Series), apply the upwardly and downward arrows to movement the series up or down in the list.
Depending on the chart blazon, some options may not exist bachelor.
Note:For most chart types, irresolute the order of the data series affects both the legend and the chart itself.
-
Click OK.
-
On the View card, click Print Layout.
-
In the chart, select a data serial. For example, in a column chart, click a column, and all columns of that data series become selected.
-
On the Chart Design tab, click Select Data.
-
In the Select Information Source dialog box, do one of the post-obit.
To
Do this
Remove a series
Nether Legend entries (Series), select the data series that you want to remove, and then click Remove (-).
Add together a serial
Under Legend entries (Series), click Add together (+), and and then in the Excel sheet, select all the information that yous want to include in the chart.
-
Click OK.
-
On the View menu, click Print Layout.
-
In the chart, select a information serial. For example, in a cavalcade chart, click a cavalcade, and all the columns of that data series become selected.
-
Click the Format tab.
-
Under Nautical chart Element Styles, click the arrow next to Fill
 , and then click the color that you lot want.
Yous can add labels to show the data bespeak values from the Excel sheet in the chart.
-
On the View card, click Print Layout.
-
Click the nautical chart, and then click the Chart Design tab.
-
Click Add Chart Element, and then click Information Labels.
-
Select the location in which you desire the data characterization to appear (for case, select Exterior End).
Depending on the chart type, some options may not exist available.
-
On the View carte, click Print Layout.
-
Click the chart, and then click the Nautical chart Design tab.
-
Click Add Chart Chemical element, and and so click Data Table.
-
Select the options that y'all desire.
Depending on the chart type, some options may non be available.
When you create a chart from data that uses dates, and the dates are plotted along the horizontal axis in the chart, Office automatically changes the horizontal axis to a date (time-calibration) axis. You can also manually modify a horizontal axis to a date axis. A date axis displays dates in chronological order at set intervals or base units, such as the number of days, months, or years, fifty-fifty if the dates on the Excel sheet are not in sequential order or in the same base units.
Past default, Role uses the smallest departure between any two dates in the data to determine the base units for the appointment axis. For example, if you lot have data for stock prices where the smallest deviation between dates is seven days, Office sets the base unit of measurement to days. However, you can change the base unit to months or years if you want to encounter the performance of the stock over a longer fourth dimension.
-
On the View bill of fare, click Print Layout.
-
Click the chart, and so click the Chart Blueprint tab.
-
Click Add together Nautical chart Element, click Axes, and then click More Axis Options. The Format Axis pane appears.
-
For the centrality that y'all want to change, make sure that the axis labels show.
-
Nether Axis Type, click Date axis.
-
Under Units, in the Base drop-down list box, select Days, Months, or Years.
Depending on the chart type, some options may not be available.
Annotation:If you lot follow this process and your chart does not brandish the dates as a fourth dimension-calibration axis, make sure that the axis labels are written in engagement format in the Excel table, such every bit 05/01/08 or May-08. To learn more about how to format cells as dates, see Display dates, times, currency, fractions, or percentages.
PowerPoint
After you create a chart, you can edit the data in the Excel sheet. The changes will be reflected in the chart in PowerPoint.
-
Click the nautical chart.
-
On the Chart Blueprint tab, click Edit Data in Excel.
Excel opens and displays the data table for the nautical chart.
-
To change the number of rows and columns that are included in the chart, residuum the pointer on the lower-right corner of the selected data, and and so drag to select additional data. In the following example, the tabular array is expanded to include additional categories and information serial.
-
To add together data to or edit information in a cell, click the prison cell, so make the change.
-
To see your changes, switch to PowerPoint.
Later you create a chart, you might desire to modify the way that table rows and columns are plotted in the nautical chart. For example, your offset version of a chart might plot the rows of data from the table on the chart'due south vertical (value) centrality, and the columns of data on the horizontal (category) axis. In the following example, the chart emphasizes sales by musical instrument.
However, if you want the chart to emphasize the sales by calendar month, you can reverse the way the chart is plotted.
-
Click the chart.
-
On the Nautical chart Design tab, select Switch Row/Cavalcade.
Switch Row/Column is available only when the chart's Excel information table is open and only for certain chart types. If Switch Row/Column is not available:
-
Click the nautical chart.
-
On the Chart Design tab, click Edit Data in Excel.
-
To modify the order of a data series, you need to work with a chart that has more than ane information serial.
-
In the chart, select a data series. For example, in a column chart, click a column, and all the columns of that data series become selected.
-
On the Nautical chart Pattern tab, click Select Information.
-
In the Select Information Source dialog box, next to Legend entries (Series), use the upwards and down arrows to move the serial upwardly or downwards in the list.
Depending on the nautical chart type, some options may not be available.
Note:For virtually nautical chart types, irresolute the order of the data series affects both the legend and the chart itself.
-
Click OK.
-
In the chart, select a data serial. For example, in a column chart, click a column, and all columns of that data series become selected.
-
Click the Chart Blueprint tab, and then click Select Data.
-
In the Select Data Source dialog box, practise one of the following.
To
Exercise this
Remove a serial
Under Fable entries (Series), select the data series that yous desire to remove, then click Remove (-).
Add together a series
Under Legend entries (Series), click Add together (+), and and so in the Excel sheet, select all the data that yous want to include in the chart.
-
Click OK.
-
In the chart, select a data series. For instance, in a cavalcade chart, click a cavalcade, and all the columns of that information series become selected.
-
Click the Format tab.
-
Under Chart Element Styles, click the arrow next to Fill
, and then click the color that you want.
You tin add together labels to prove the information point values from the Excel sheet in the chart.
-
Click the chart, and then click the Nautical chart Design tab.
-
Click Add Chart Element, and then click Data Labels.
-
Select the location in which yous want the data label to appear (for example, select Outside Stop).
Depending on the chart type, some options may not exist available.
-
Click the chart, and then click the Chart Design tab.
-
Click Add Chart Element, and then click Data Table.
-
Select the options that yous want.
Depending on the chart blazon, some options may not be available.
When you create a chart from data that uses dates, and the dates are plotted along the horizontal axis in the nautical chart, Office automatically changes the horizontal axis to a date (time-calibration) axis. You tin also manually change a horizontal axis to a appointment centrality. A date axis displays dates in chronological order at set intervals or base units, such as the number of days, months, or years, even if the dates on the Excel sheet are not in sequential order or in the same base units.
By default, Function uses the smallest deviation between any two dates in the data to determine the base units for the date centrality. For example, if you have data for stock prices where the smallest deviation between dates is 7 days, Part sets the base unit to days. However, y'all tin change the base unit to months or years if you want to run into the performance of the stock over a longer time.
-
Click the chart, and then click the Chart Blueprint tab.
-
Click Add together Nautical chart Chemical element, click Axes, and then click More Centrality Options. The Format Axis pane appears.
-
For the axis that y'all desire to change, brand sure that the axis labels show.
-
Nether Axis Blazon, select Date centrality.
-
Under Units, in the Base driblet-down list box, select Days, Months, or Years.
Depending on the nautical chart type, some options may non be available.
Note:If yous follow this procedure and your nautical chart does not display the dates as a time-scale axis, brand certain that the axis labels are written in date format in the Excel table, such as 05/01/08 or May-08. To learn more nigh how to format cells as dates, see Display dates, times, currency, fractions, or percentages.
Excel
After yous create a chart, y'all can edit the data in the Excel sheet. The changes will be reflected in the nautical chart.
-
Click the chart.
Excel highlights the data tabular array that is used for the chart. The greyness fill up indicates a row or column used for the category axis. The carmine fill indicates a row or cavalcade that contains data serial labels. The blue fill indicates data points plotted in the chart.
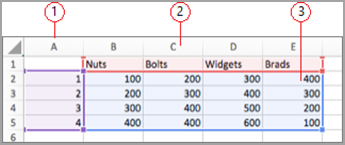
 Data series labels
 Values for the category axis
 Information points plotted in the chart
 -
To change the number of rows and columns that are included in the chart, balance the pointer on the lower-right corner of the selected data, and and then elevate to select additional data. In the following example, the tabular array is expanded to include additional categories and data series.
Tip:To forestall that data from beingness displayed in the chart, you tin can hide rows and columns in the tabular array.
-
To add information to or edit data in a cell, click the cell, so make the modify.
Later you create a nautical chart, you might want to modify the way that table rows and columns are plotted in the chart. For example, your kickoff version of a chart might plot the rows of data from the table on the chart's vertical (value) axis, and the columns of data on the horizontal (category) axis. In the following case, the chart emphasizes sales by instrument.
However, if y'all want the chart to emphasize the sales by calendar month, y'all can reverse the way the chart is plotted.
-
Click the chart.
-
On the Chart Design tab, click Switch Row/Column.
To alter the order of a data serial, you demand to piece of work with a nautical chart that has more than one information series.
-
In the chart, select a information series. For example, in a cavalcade chart, click a column, and all the columns of that data serial get selected.
-
On the Nautical chart Pattern tab, click Select Data.
-
In the Select Data Source dialog box, side by side to Legend entries (Series), use the up and downwards arrows to movement the serial up or down in the list.
Depending on the chart type, some options may non exist bachelor.
Notation:For virtually chart types, changing the order of the data series affects both the legend and the chart itself.
-
Click OK.
-
In the chart, select a data series. For case, in a column nautical chart, click a column, and all columns of that information series become selected.
-
Click the Chart Blueprint tab, and then click Select Information.
-
In the Select Data Source dialog box, do one of the following.
To
Practise this
Remove a series
Nether Legend entries (Series), select the data series that you want to remove, and then click Remove (-).
Add a series
Under Legend entries (Series), click Add (+), and then in the Excel sheet, select all the data that yous want to include in the chart.
-
Click OK.
-
In the chart, select a data series. For example, in a cavalcade nautical chart, click a cavalcade, and all the columns of that data series go selected..
-
Click the Format tab.
-
Under Chart Element Styles, click the arrow adjacent to Make full
, so click the color that you lot want.Tip:To vary the colour by data point in a nautical chart that has only one data serial, click the series, and and then click the Format tab. Click Fill, and then depending on the nautical chart, select the Vary colour past point check box or the Vary color past slice bank check box. Depending on the chart type, some options may not exist available.
You can add labels to show the data bespeak values from the Excel sheet in the chart.
-
Click the chart, and then click the Nautical chart Design tab.
-
Click Add Chart Chemical element, and and then click Data Labels.
-
Select the location in which yous want the information characterization to announced (for instance, select Outside End).
Depending on the nautical chart type, some options may non be available.
-
Click the chart, and then click the Chart Design tab.
-
Click Add Nautical chart Element, and so click Information Table.
-
Select the options that you want.
Depending on the chart type, some options may not be available.
When y'all create a chart from data that uses dates, and the dates are plotted forth the horizontal axis in the chart, Function automatically changes the horizontal axis to a date (time-scale) axis. You can also manually change a horizontal centrality to a engagement centrality. A engagement axis displays dates in chronological order at set intervals or base units, such as the number of days, months, or years, even if the dates on the Excel sheet are not in sequential order or in the aforementioned base units.
By default, Function uses the smallest divergence between any two dates in the data to determine the base units for the date axis. For example, if you have data for stock prices where the smallest difference between dates is seven days, Office sets the base unit to days. However, you tin can change the base unit to months or years if you want to encounter the performance of the stock over a longer fourth dimension.
-
Click the chart, and so click the Chart Design tab.
-
Click Add Chart Element, click Axes, then click More Axis Options. The Format Axis pane appears.
-
For the axis that you want to change, make sure that the centrality labels show.
-
Under Axis Type, select Engagement axis.
-
Nether Units, in the Base drib-down list box, select Days, Months, or Years.
Depending on the chart blazon, some options may not be available.
Notation:If you follow this procedure and your chart does not display the dates as a fourth dimension-scale axis, make certain that the centrality labels are written in date format in the Excel table, such as 05/01/08 or May-08. To acquire more about how to format cells equally dates, encounter Display dates, times, currency, fractions, or percentages.
Source: https://support.microsoft.com/en-us/office/update-the-data-in-an-existing-chart-9776678e-c608-4a7c-9679-5c70e374f9be
Posted by: lewistheyear.blogspot.com
0 Response to "How To Update One Datatable Changes To Another Datatable C#"
Post a Comment